Our AVR toolchain
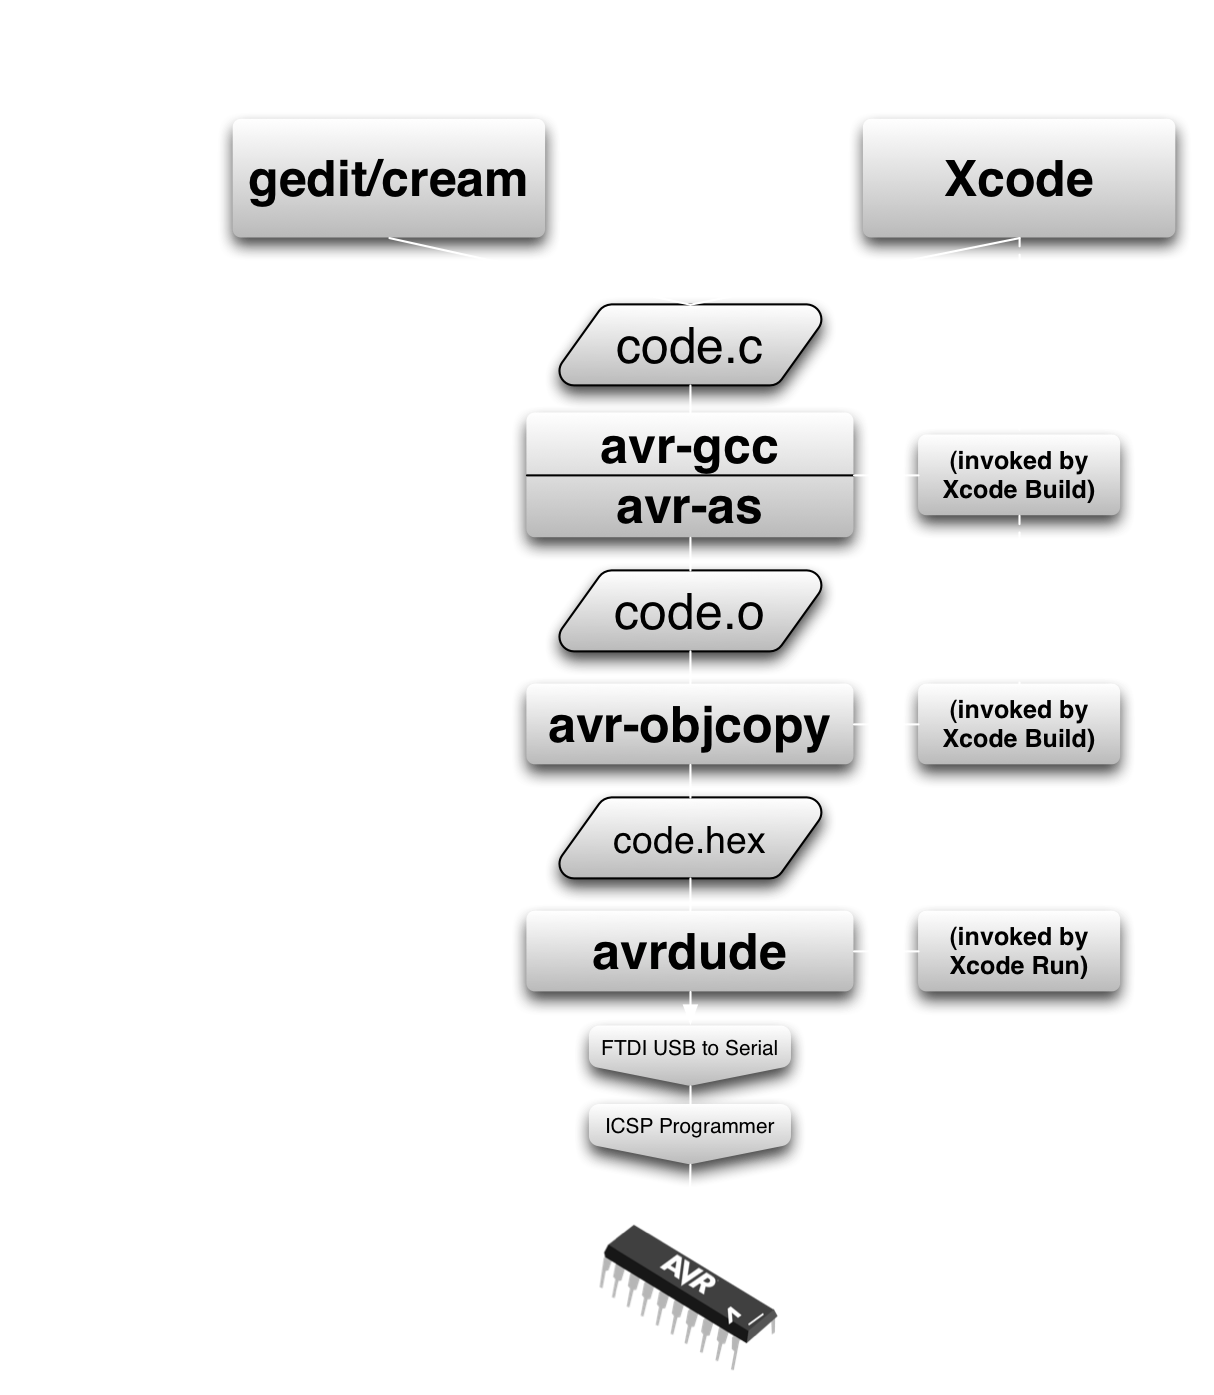
For our example project, we will create two similar toolchains – one for Mac OS X and one for Linux. Â Here’s a visual overview of how code will flow:

If you’ve developed with C or C++ before, the diagram should look familiar. I’m assuming just one object here – if we had more, avr-ld works much the same as our traditional linker does. And, of course, we can write C++, tossing avr-g++ in for avr-gcc.
On the Linux side, I chose not to set up an IDE, but maybe my Mac approach will help you set one up. For Mac, I set up a Makefile-based Xcode project and run script to invoke these tools in order and provide the “pretty” Build Results screen. Someday, I hope to introduce gdb on-device debugging, but for now, it’s Build and Run only.
Toolchain Construction: Mac OS X
I’m assuming that if you’re reading this, you probably already have Xcode. If not, it’s not strictly necessary – you can follow the text editor + command line formula outlined for Linux equally well on OS X.
Our big helper here is MacPorts. If you have the latest version already installed, you can skip the next section.
Installing MacPorts
MacPorts is a great package management tool for Mac OS X, akin to ports on BSD and apt-get on Linux. A .pkg (standard OS X) installer is available here. Download the .dmg, mount it, and double click the Installer package. The usual installer semantics apply here.
Updating MacPorts
I neglected this step and it bit me hard.
Fire up Terminal.app and issue:
sudo port -v selfupdate
which will ask you for your password. Now, we can start the fun of actually installing the appropriate packages from the repository.
Installing Relevant Packages
We may not need all of these right away, but here’s our grocery list:
- avr-binutils – tools for cross-platform development with AVR
- avr-gcc – the bread and butter of our toolchain, obvious from its name.
- avr-gdb – again, from the name, the GNU debugger for AVR.
- avr-libc – some core C functions for use on the AVR platform. Without this, our programs probably won’t be very useful (or pretty).
- avrdude – AVR flasher software.
To install them, again use Terminal.app, this time with the command:
sudo port install avr-binutils avr-gcc avr-gdb avr-libc avrdude
You may see some unrecognized packages floating by; these are likely dependencies of the packages we wish to install. It is normal for this process to take quite some time. Let’s all go to the kitchen and have ourselves a snack!
Test the new toys
After some time, everything will be built and ready to go. This is the moment of truth where we see if your PATH environment variable is set up to play nicely with MacPorts.
Create a new Terminal window and try running the command:
avr-gcc -v
The response should end with something like
gcc version 4.0.2
If that’s so, it looks like you’re ready to rock!
Toolchain Construction: Linux
For Ubuntu users, grab the following packages via apt-get or synaptic:
- binutils-avr – tools for cross-platform development with AVR
- gcc-avr – the bread and butter of our toolchain, obvious from its name.
- gdb-avr – again, from the name, the GNU debugger for AVR.
- avr-libc – some core C functions for use on the AVR platform. Without this, our programs probably won’t be very useful (or pretty).
- avrdude – AVR flasher software.
- avarice – If we need to do GDB over JTAG.
- simulavr – Simulates AVR hardware for debugging and testing.
If you’re down with the terminal (and I hope you are), grab them all at once with the command:
apt-get install binutils-avr gcc-avr gdb-avr avr-libc avrdude avarice simulavr
Create a new Terminal window and try running the command:
avr-gcc -v
The response should end with something like
gcc version 4.3.4
If that’s so, it looks like you’re ready to rock!


